PBRtoMaya 是我在2017年寫的工具,當時覺得在MAYA內每次串接PBR 的節點覺得相當繁瑣,市面上的工具步驟繁雜,功能也不符合我想要的要求,也為了規範團隊同仁的檔案一致性,於是就索性自己寫了一個,依照Megascans的資產為範本規範,除了可以讀取常用的PBR規範貼圖,也可以幫你導入Megascans的物件並將材質安裝上,目前可以針對Anrold,Vray,RedShift,RenderMan,這四套算圖引擎產生基本PBR節點,分享給各位業界朋友使用。
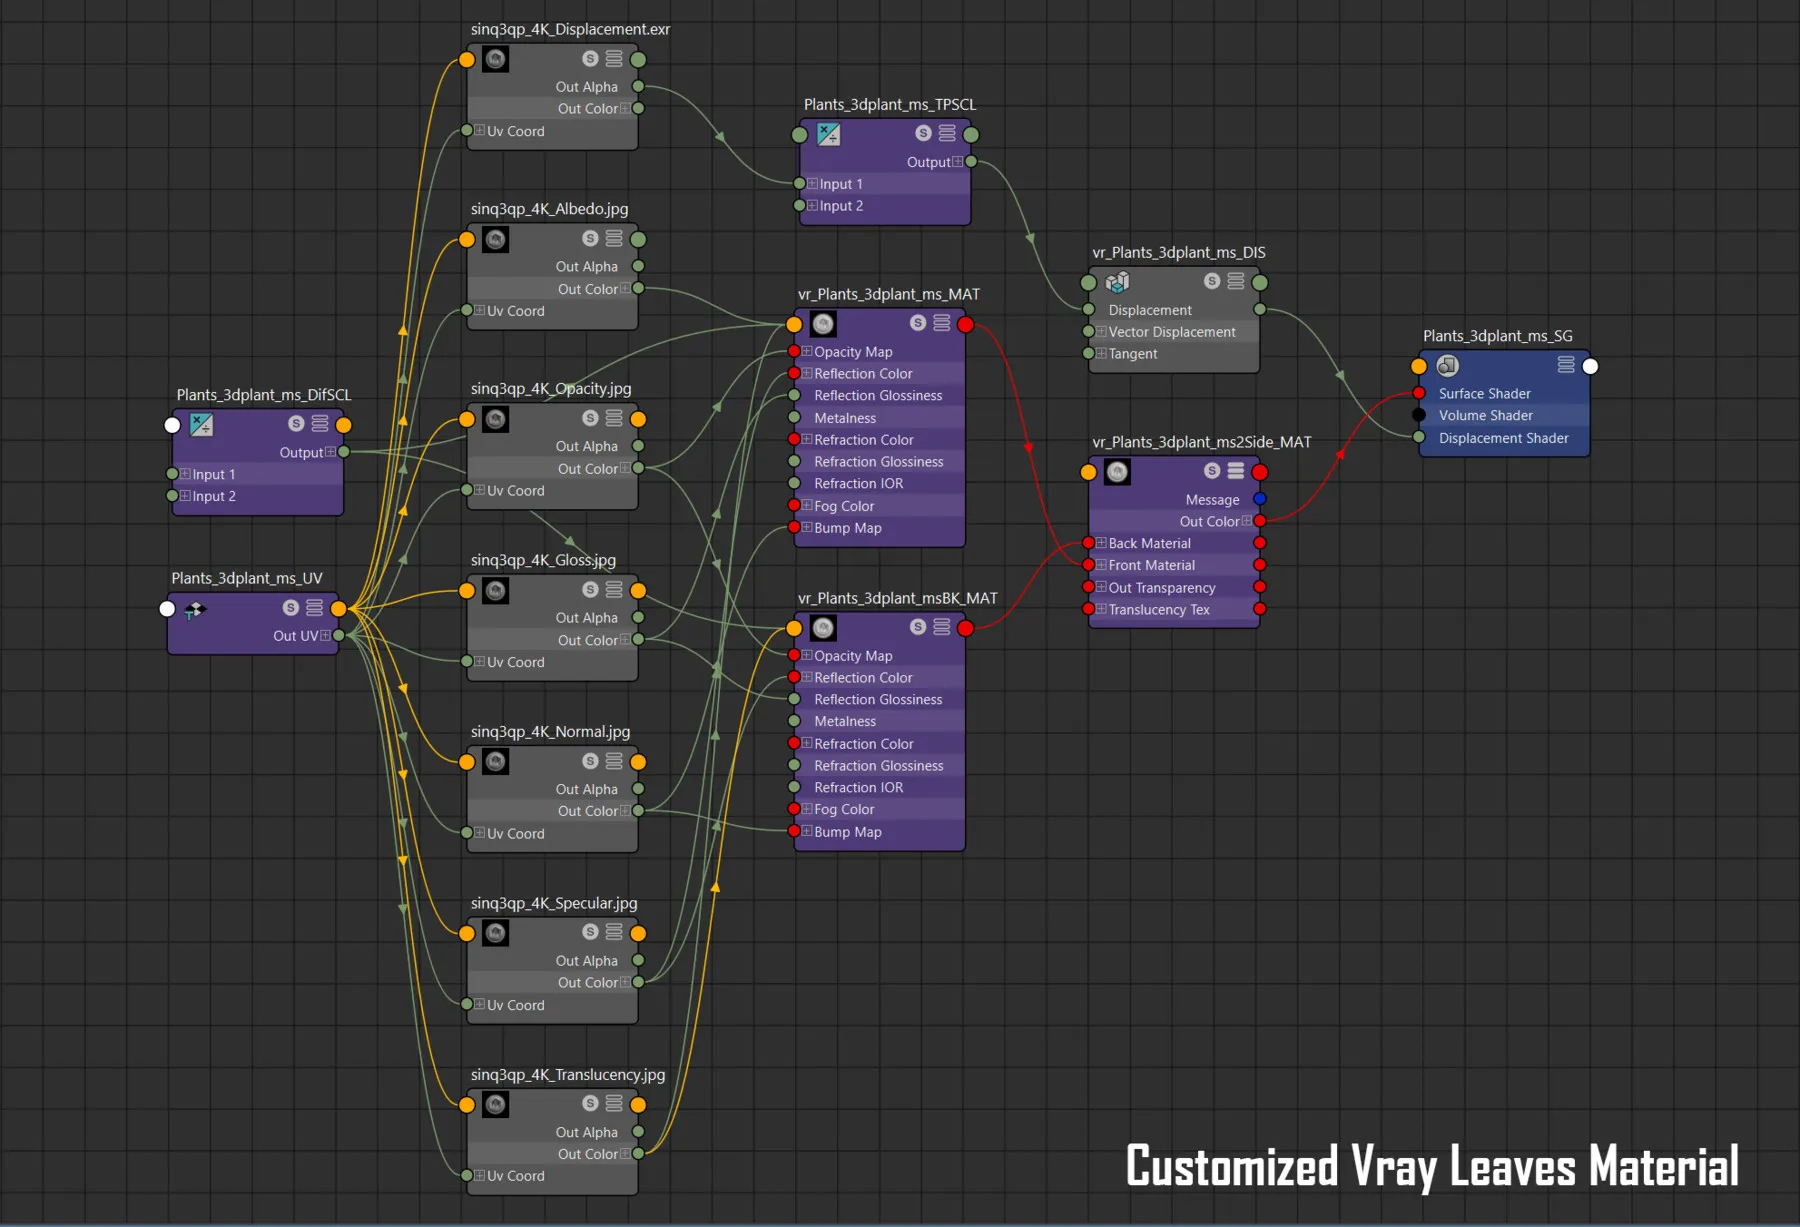
PBRtoMaya它不單純是PBR材質工具,如果你想將Magascans資產導入場景做set dressing 也非常方便迅速,當初我常處理這些事情而開發,而將材質串接成TriPlaner投影mapping也非常好用,TriPlaner在處理大型地形材質時是非常重要方便的功能。
PBRtoMaya is a tool I wrote in 2017. At the time, I found it quite tedious to manually connect PBR nodes in Maya. The available tools were complex and didn’t meet my needs. To ensure consistency in my team’s files, I decided to create my own tool. It follows the Megascans assets as a standard, allowing you to import commonly used PBR textures and automatically apply materials to Megascans objects. Currently, it can generate basic PBR nodes for four rendering engines: Arnold, Vray, Redshift, and RenderMan. I’m sharing it with my industry friends to make their workflow easier.
PBRtoMaya is not just a PBR material tool; it also makes importing Megascans assets for set dressing in scenes very convenient and quick. I developed it because I frequently handled these tasks. Additionally, it’s highly useful for connecting materials with TriPlanar projection mapping, which is an essential and convenient feature when working with large terrain materials.
PBRtoMaya는 제가 2017년에 작성한 도구입니다. 그 당시 Maya에서 PBR 노드를 연결하는 과정이 매우 번거롭다고 느꼈습니다. 시중에 나와 있는 도구들은 복잡하고 제가 원하는 기능을 충족하지 못했습니다. 팀 파일의 일관성을 보장하기 위해 저는 직접 도구를 만들기로 했습니다. Megascans 자산을 기준으로 하여 일반적으로 사용되는 PBR 텍스처를 읽고 Megascans 객체에 재질을 자동으로 적용할 수 있습니다. 현재 Arnold, Vray, Redshift, RenderMan의 네 가지 렌더링 엔진에 대해 기본 PBR 노드를 생성할 수 있습니다. 이 도구를 업계 친구들에게 공유하여 작업 효율성을 높이고자 합니다.
PBRtoMaya는 단순한 PBR 재질 도구가 아닙니다. Megascans 자산을 씬에 임포트하여 세트 드레싱을 하는 것도 매우 편리하고 빠르게 할 수 있습니다. 제가 이러한 작업을 자주 처리했기 때문에 개발하게 되었습니다. 또한, 재질을 TriPlanar 프로젝션 매핑으로 연결하는 것도 매우 유용하며, 대형 지형 재질을 처리할 때 중요한 편리한 기능입니다.
「PBRtoMayaは、2017年に私が作成したツールです。当時、MayaでPBRノードを接続するのが非常に面倒だと感じました。市販のツールは複雑で、私の要件を満たしていませんでした。チームのファイルの一貫性を確保するために、自分でツールを作ることにしました。Megascansのアセットを基準に、一般的なPBRテクスチャを読み込むだけでなく、Megascansのオブジェクトに自動でマテリアルを適用することができます。現在、Arnold、Vray、Redshift、RenderManの4つのレンダリングエンジン向けに基本的なPBRノードを生成できます。業界の友人たちとこのツールを共有し、作業の効率化を図っています。
PBRtoMaya は、単なる PBR マテリアルツールではありません。Megascans のアセットをシーンにインポートしてセットドレッシングを行うのも非常に便利で迅速です。このツールは、私がこれらの作業を頻繁に行っていたために開発しました。さらに、マテリアルをトライプラナープロジェクションマッピングに接続することも非常に便利で、大規模な地形のマテリアルを処理する際に非常に重要な機能です。」
請選擇Maya對應版本下載
Please select the corresponding Maya version to download
Maya 버전에 맞는 다운로드를 선택하세요
「対応するMayaバージョンを選んでダウンロードしてください。」
PBRtoMaya1.1
PBRtoMaya1.5
PBRtoMaya1.52
PBRtoMaya1.6
下載及使用說明
這些工具可以免費下載,並且可以用於個人或商業項目。
These tools are available for free download and can be used for personal or commercial projects.
이 도구들은 무료로 다운로드할 수 있으며 개인 또는 상업적 프로젝트에 사용할 수 있습니다.
これらのツールは無料でダウンロードでき、個人または商業プロジェクトに使用できます。
- Maya Support : 2017~2025
- Render Engine Support : Vray3.6~ ,Vray Next , RenderMan , Arnold, Redshift
maya2025版本僅提供購買者使用,還請見諒。
“The Maya 2025 version is available only for purchasers. Thank you for your understanding.”
“Maya 2025 버전은 구매자만 사용할 수 있습니다. 양해 부탁드립니다.”
“Maya 2025版は購入者のみが使用できます。ご了承ください。”
Artstation Link

安裝說明
설치 안내 ||インストール手順

解壓縮後會有如圖中的檔案
After extracting, you will see files like those shown in the image
압축을 풀면 이미지에 표시된 것과 같은 파일이 나타납니다
「解凍後、画像のようなファイルが表示されます。」
Substance Painter Output Texture Preset
首先 PBRtoAll.spexp 是Substance Painter輸出貼圖使用的設定,依照megascanes的貼圖規範,如果你有使用Substance Painter請複製到 C:\Users\USER\Documents\Allegorithmic\Substance Painter\shelf\export-presets檔案夾中使用
First, PBRtoAll.spexp is a preset used for exporting textures in Substance Painter, following the Megascans texture standard. If you are using Substance Painter, please copy it to the C:\Users\USER\Documents\Allegorithmic\Substance Painter\shelf\export-presets folder for use.
먼저 PBRtoAll.spexp는 Megascans 텍스처 규격을 따르는 Substance Painter에서 텍스처를 내보낼 때 사용하는 설정 파일입니다. Substance Painter를 사용 중이라면, C:\Users\USER\Documents\Allegorithmic\Substance Painter\shelf\export-presets 폴더에 복사하여 사용하세요.
「まず、PBRtoAll.spexp は、Megascans のテクスチャ規格に従って Substance Painter でテクスチャをエクスポートするための設定です。Substance Painter を使用している場合は、C:\Users\USER\Documents\Allegorithmic\Substance Painter\shelf\export-presets フォルダにコピーして使用してください。」
PBRtoMaya Installtion Instructions

Maya的安裝選取圖中灰色的檔案
For Maya installation, select the gray file shown in the image
Maya 설치 시 이미지에 표시된 회색 파일을 선택하세요
「Mayaのインストールでは、画像の灰色のファイルを選択してください。」
將 icons 檔案夾, PBRtoMaya.pyc , PBRtoMaya.ui , PBRtoMayaUI.pyc 4個檔案複製到 “C:\Users\USER\Documents\maya\20XX\scripts” 路徑下
“Copy the icons folder, PBRtoMaya.pyc, PBRtoMaya.ui, and PBRtoMayaUI.pyc files to the C:\Users\USER\Documents\maya\20XX\scripts directory.”
icons 폴더, PBRtoMaya.pyc, PBRtoMaya.ui, PBRtoMayaUI.pyc 파일을 C:\Users\USER\Documents\maya\20XX\scripts 경로에 복사하세요.
「iconsフォルダ、PBRtoMaya.pyc、PBRtoMaya.ui、PBRtoMayaUI.pyc の4つのファイルを C:\Users\USER\Documents\maya\20XX\scripts パスにコピーしてください。」
Install Pymel
Maya 2024 開始 不內建Pymel,請使用windows 命令提示字元執行安裝下面Command,請注意你的maya版本號。(2023之前版本可以跳過無需安裝)
“Starting with Maya 2024, PyMEL is not included by default. Please use the Windows command prompt to install using the following command. Be sure to check your Maya version number. (Versions prior to 2023 do not require this installation.)”
“Maya 2024부터 PyMEL이 기본적으로 포함되지 않습니다. 다음 명령어를 사용하여 Windows 명령 프롬프트에서 설치하십시오. Maya 버전 번호를 확인하십시오. (2023년 이전 버전은 설치가 필요 없습니다.)”
“Maya 2024からPyMELはデフォルトで含まれなくなります。以下のコマンドを使用してWindowsコマンドプロンプトでインストールしてください。Mayaのバージョン番号を確認してください。(2023年以前のバージョンはインストール不要です。)”
Create a Maya Shelf

import PBRtoMayaUI as PBRMUIimport PBRtoMaya as PBRMimport osPBRMUI.createUI(os.path.dirname(PBRMUI.__file__))- 打開Maya
- 複製上面代碼到 Script Editor Python
- Open Maya.
- Copy the above code into the Script Editor in Python.
- Maya를 엽니다.
- 위의 코드를 Script Editor의 Python 탭에 복사합니다.
- Mayaを開きます。
- 上記のコードをScript EditorのPythonタブにコピーします。

3. 將Script Editor中代碼選取起來,按住滑鼠中鍵拖到shelf中
3. Select the code in the Script Editor, then hold down the middle mouse button and drag it to the shelf.
3. Script Editor에서 코드를 선택한 후, 마우스 중간 버튼을 누른 채로 shelf로 드래그하세요.
3. Script Editorでコードを選択し、マウスの中ボタンを押しながらシェルフにドラッグしてください。

4.到main menu bar: Windows > Settings/Preferences > Shelf Editor 打開選單
4. Open the menu by going to the main menu bar: Windows > Settings/Preferences > Shelf Editor.
4. 메뉴 모음에서: Windows > Settings/Preferences > Shelf Editor로 가서 메뉴를 엽니다.
4. メインメニューバーから、Windows > Settings/Preferences > Shelf Editorに進んでメニューを開きます。

5.如下圖確認Shelves類型,選擇代碼,然後變更Icon Name到你安裝的”C:/Users/USER/Documents/maya/20XX/scripts/icon/PBRtoMayaIcon.png”路徑中Icon圖檔
6.Save All Shelves
7.點擊shelf中工具Icon使用
- In the image below, confirm the Shelves type, select the code, and then change the Icon Name to the icon file in your installation path: “C:/Users/USER/Documents/maya/20XX/scripts/icon/PBRtoMayaIcon.png”.
- Save All Shelves.
- Click the tool icon in the shelf to use it.
- 아래 그림에서 Shelves 유형을 확인하고, 코드를 선택한 다음, Icon Name을 설치 경로의 아이콘 파일로 변경합니다: “C:/Users/USER/Documents/maya/20XX/scripts/icon/PBRtoMayaIcon.png”.
- 모든 Shelves 저장.
- Shelf에서 도구 아이콘을 클릭하여 사용하세요.
- 下の図で Shelves の種類を確認し、コードを選択した後、Icon Name をインストールパスのアイコンファイルに変更します: “C:/Users/USER/Documents/maya/20XX/scripts/icon/PBRtoMayaIcon.png”。
- すべての Shelves を保存します。
- Shelf のツールアイコンをクリックして使用します。
使用說明
사용 설명
"1"

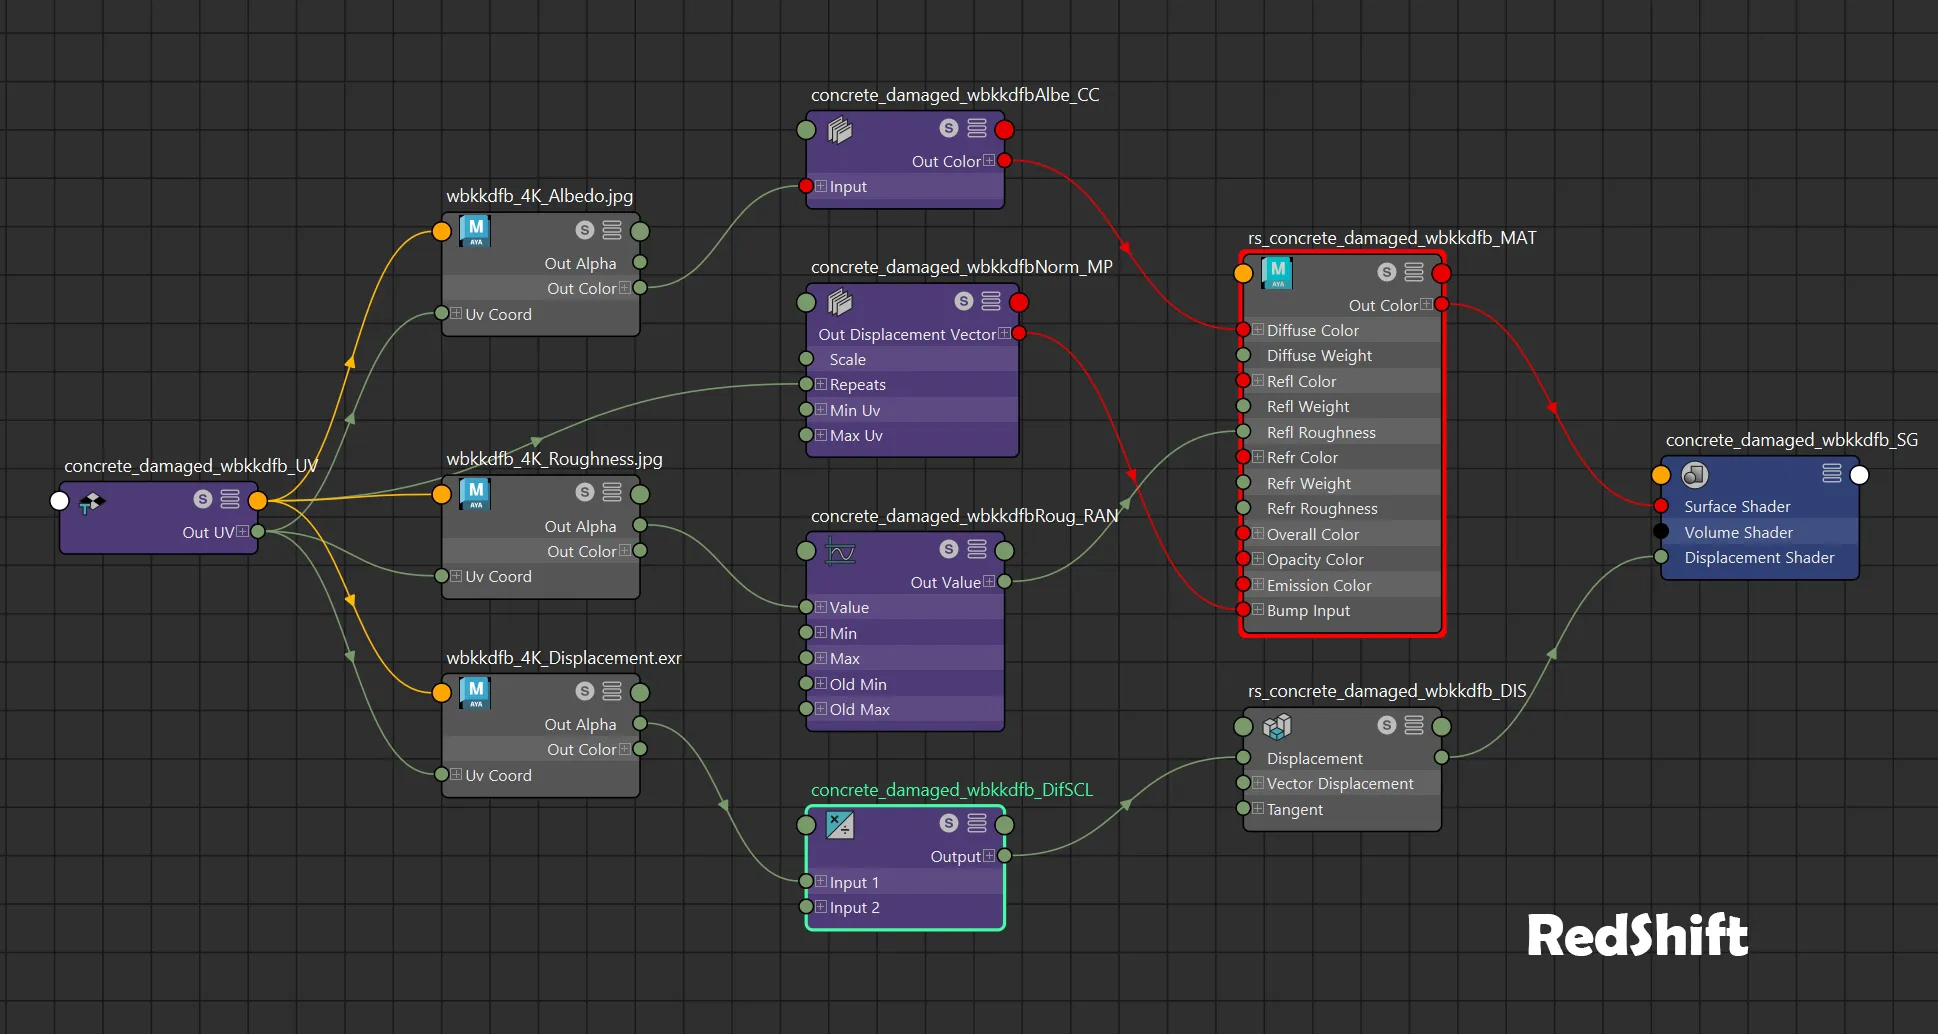
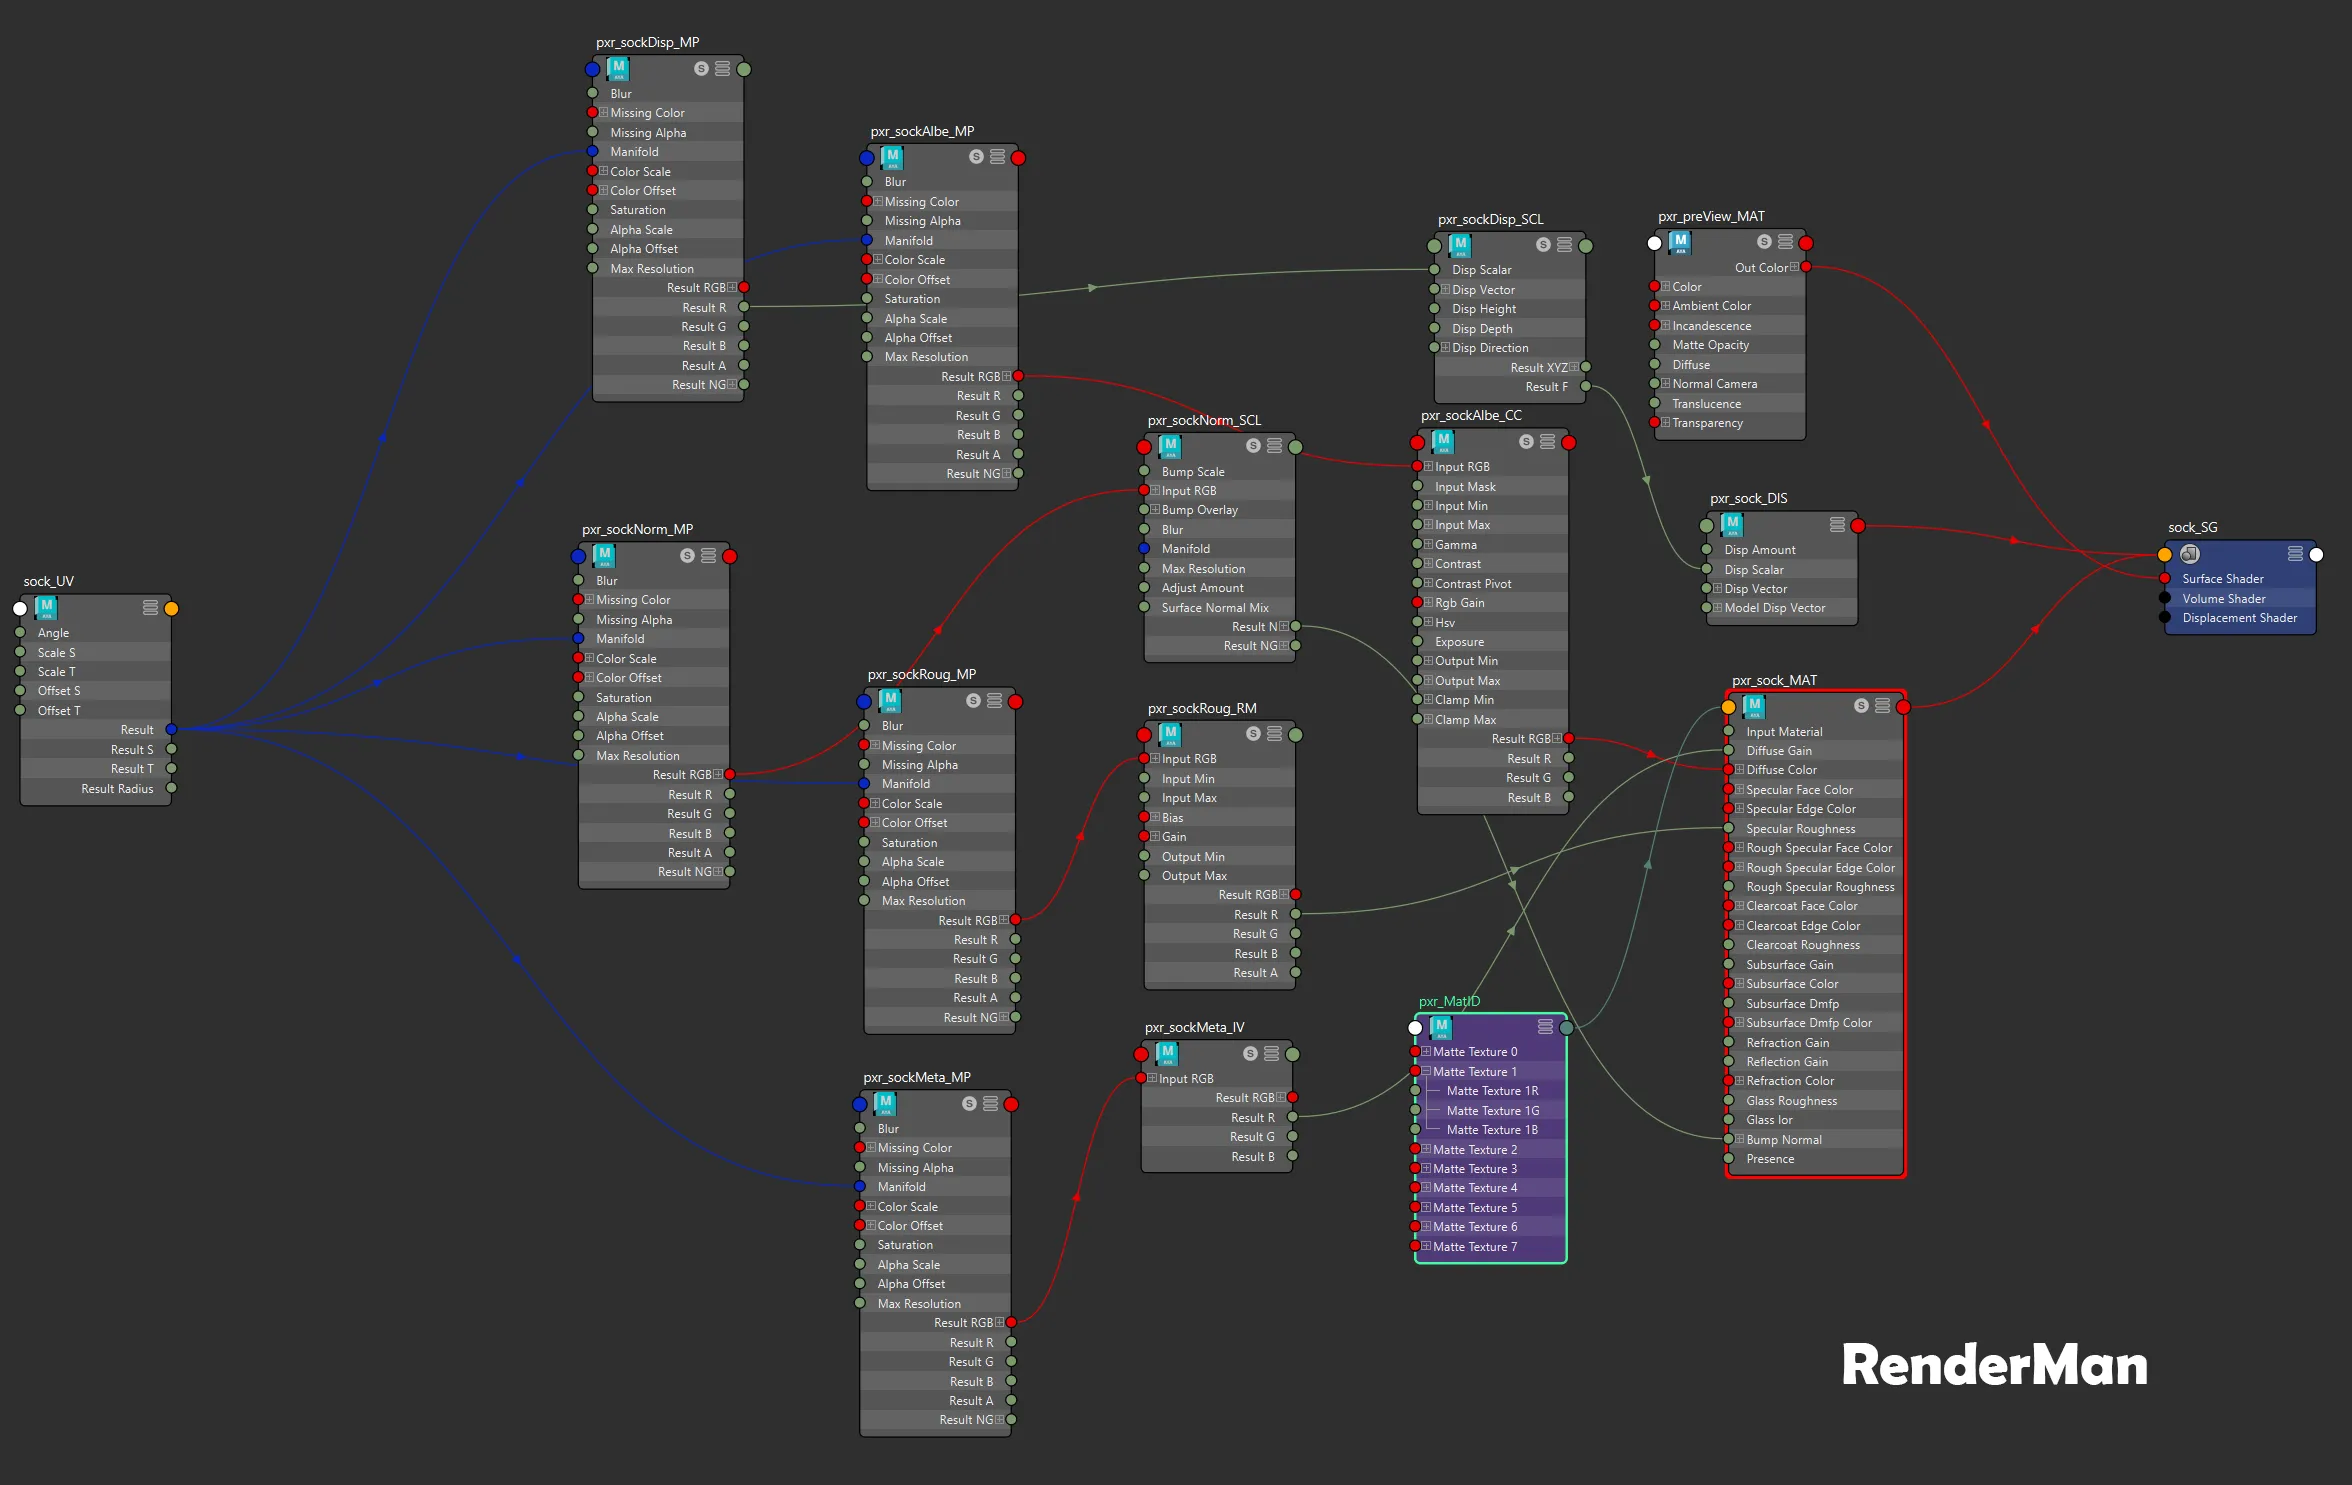
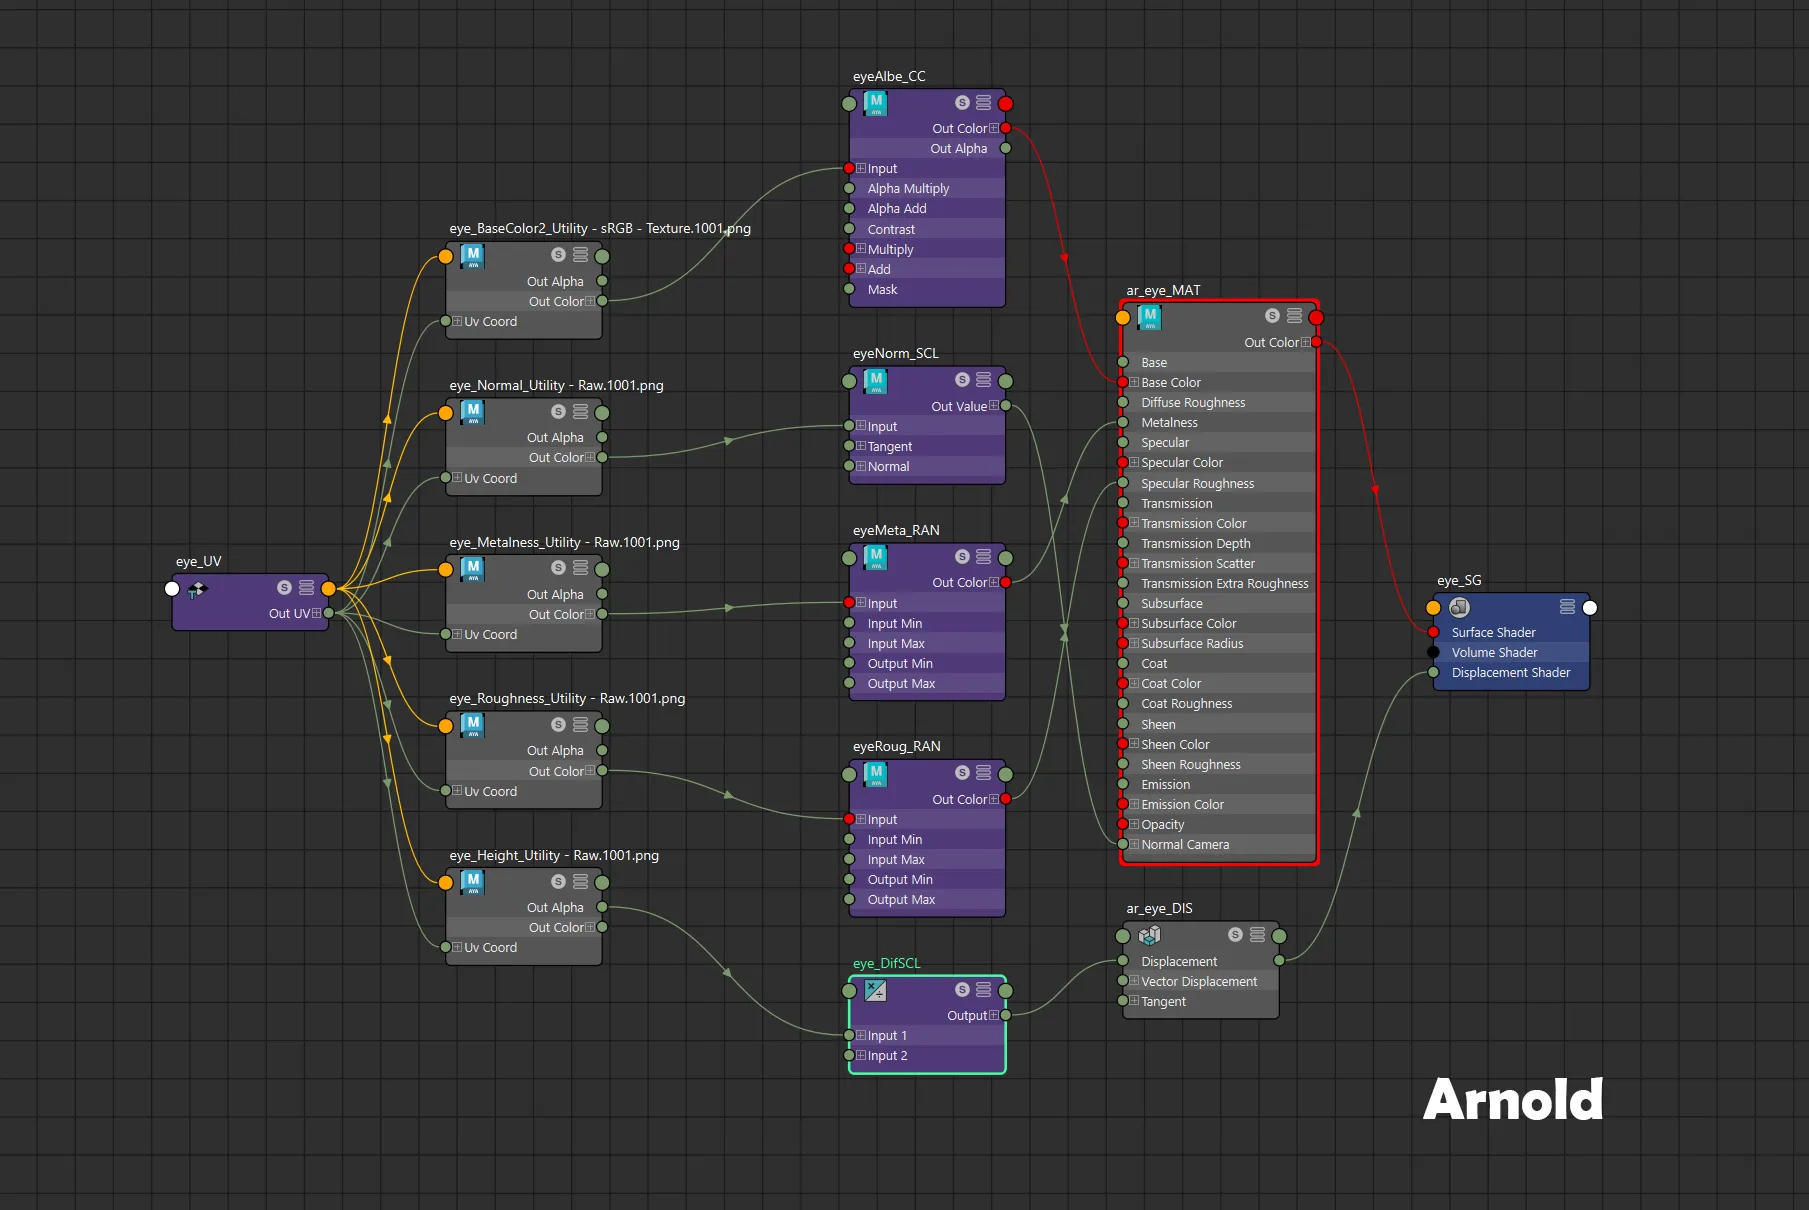
首先需要去Render Settings 選擇你所使用的算圖引擎,目前支援Arnold,Vray,RedShift,Renderman四種
“First, go to Render Settings and select the rendering engine you are using. Currently, support is provided for four engines: Arnold, Vray, RedShift, and RenderMan.”
“먼저 Render Settings로 이동하여 사용하는 렌더링 엔진을 선택하세요. 현재 Arnold, Vray, RedShift, RenderMan의 네 가지 엔진을 지원합니다.”
「まず、Render Settings に移動し、使用しているレンダリングエンジンを選択してください。現在、Arnold、Vray、RedShift、RenderManの4つのエンジンをサポートしています。」
"2"

點擊 Select Folder 按鈕(紅框),會跳出視窗選取你的貼圖資料夾路徑,或直接複製貼圖資料夾路徑到Path(藍框)再點擊Select Folder按鈕。
第二種複製貼圖資料夾路徑方式常用於從Quixel Bridge copy 物件材質路徑使用
注意:請一個資料夾只放一組材質的貼圖,我工具預設會以此資料夾名稱當作材質的命名
“Click the Select Folder button (red box) to open a window where you can choose your texture folder path, or you can directly copy the texture folder path into the Path field (blue box) and then click the Select Folder button.
The second method is commonly used when copying material paths from Quixel Bridge.
Note: Please ensure that each folder contains only one set of texture maps. My tool will use the folder name as the material name by default.”
“Select Folder 버튼(빨간 상자)을 클릭하면 창이 열리며 텍스처 폴더 경로를 선택할 수 있습니다. 또는 텍스처 폴더 경로를 Path(파란 상자)에 직접 복사한 후 Select Folder 버튼을 클릭하세요.
두 번째 방법은 Quixel Bridge에서 재질 경로를 복사할 때 자주 사용됩니다.
주의: 각 폴더에는 한 세트의 텍스처 맵만 포함되어야 합니다. 도구는 기본적으로 해당 폴더 이름을 재질 이름으로 사용합니다.”
「Select Folder ボタン(赤枠)をクリックすると、テクスチャフォルダのパスを選択するウィンドウが表示されます。または、Path(青枠)にテクスチャフォルダのパスを直接コピーしてから、Select Folder ボタンをクリックしてください。
2番目の方法は、Quixel Bridge から素材のパスをコピーする際によく使用されます。
注意:各フォルダには1セットのテクスチャマップのみを含めてください。ツールはデフォルトでこのフォルダ名をマテリアル名として使用します。」

第二種複製貼圖資料夾路徑方式常用於從Quixel Bridge copy 物件材質路徑使用
The second method is commonly used when copying material paths from Quixel Bridge.
두 번째 방법은 Quixel Bridge에서 재질 경로를 복사할 때 자주 사용됩니다.
2番目の方法は、Quixel Bridge から素材のパスをコピーする際によく使用されます。
"3"

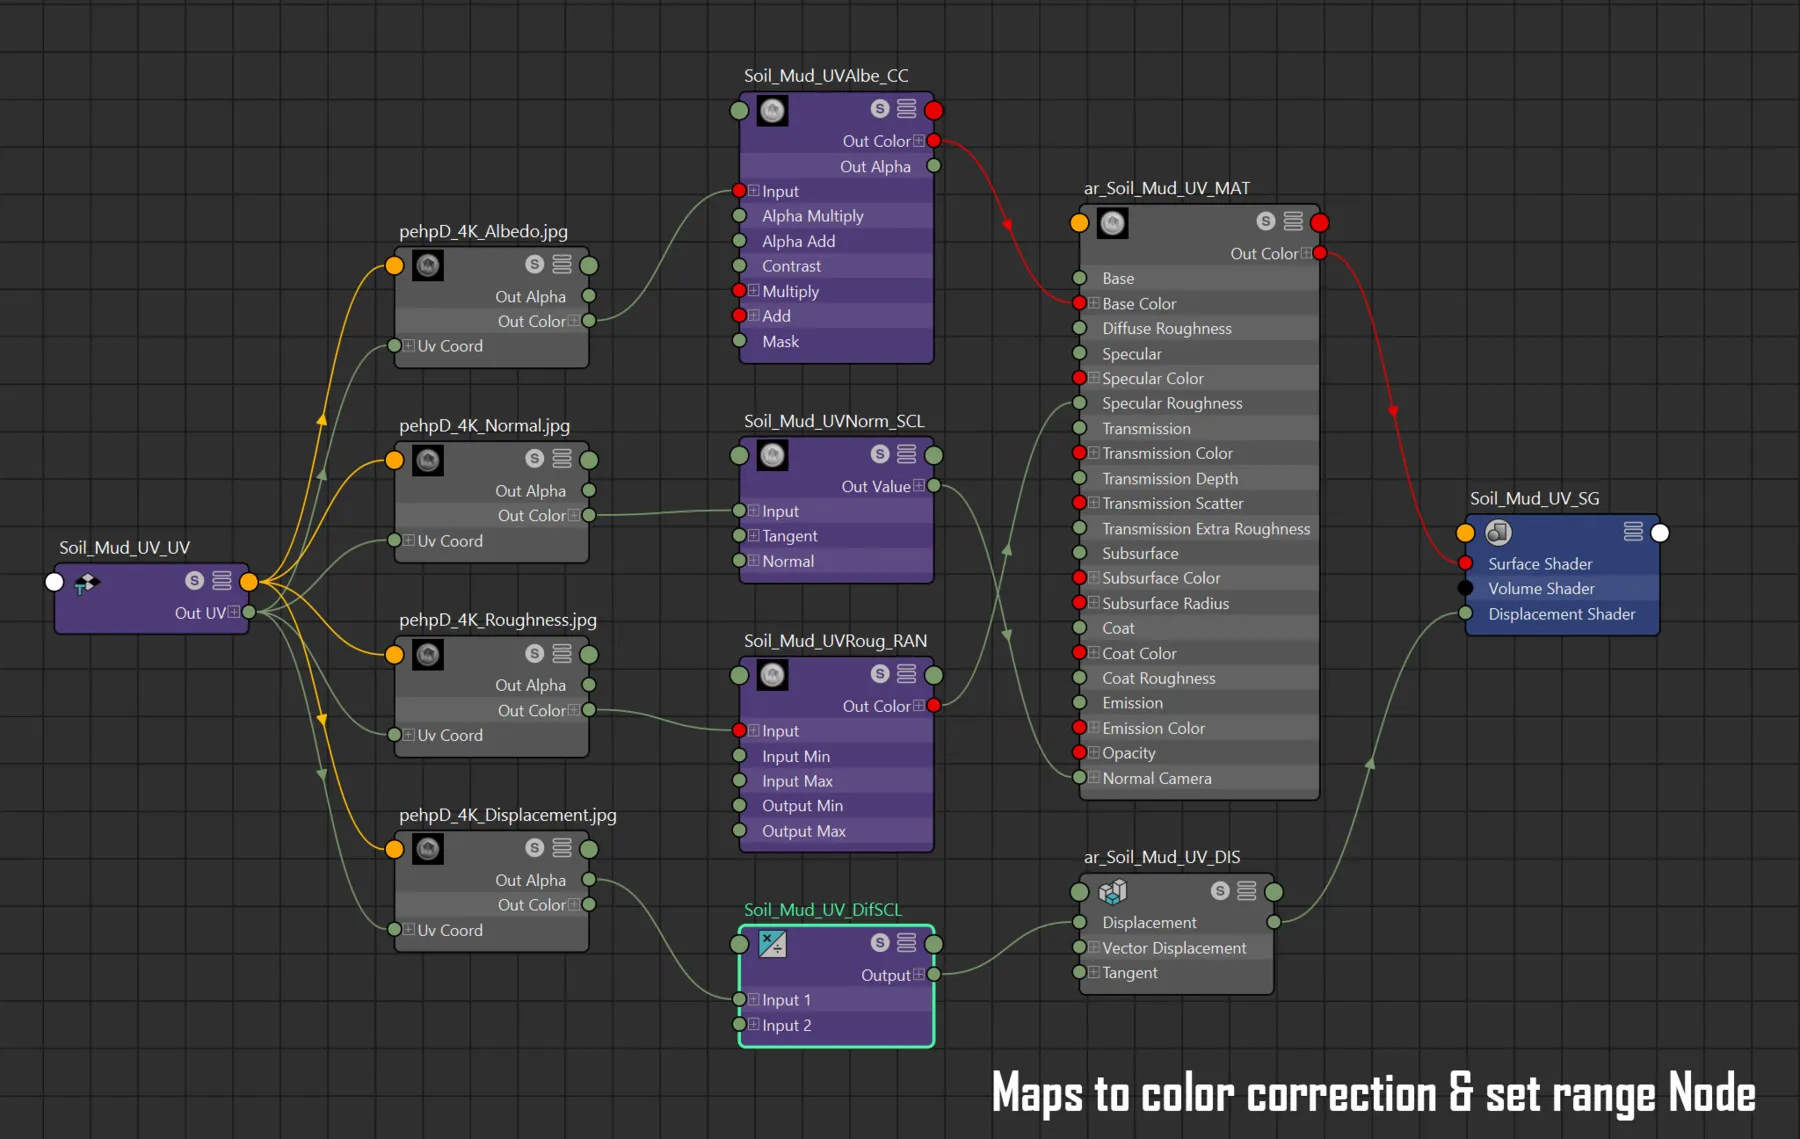
這時會看到貼圖相關資訊會讀取進來,這時按下圖紅框選項,決定貼圖類型
1.UV 一般會使用這選項
2.UDIM 當貼圖是屬於有UDIM編號的選擇此
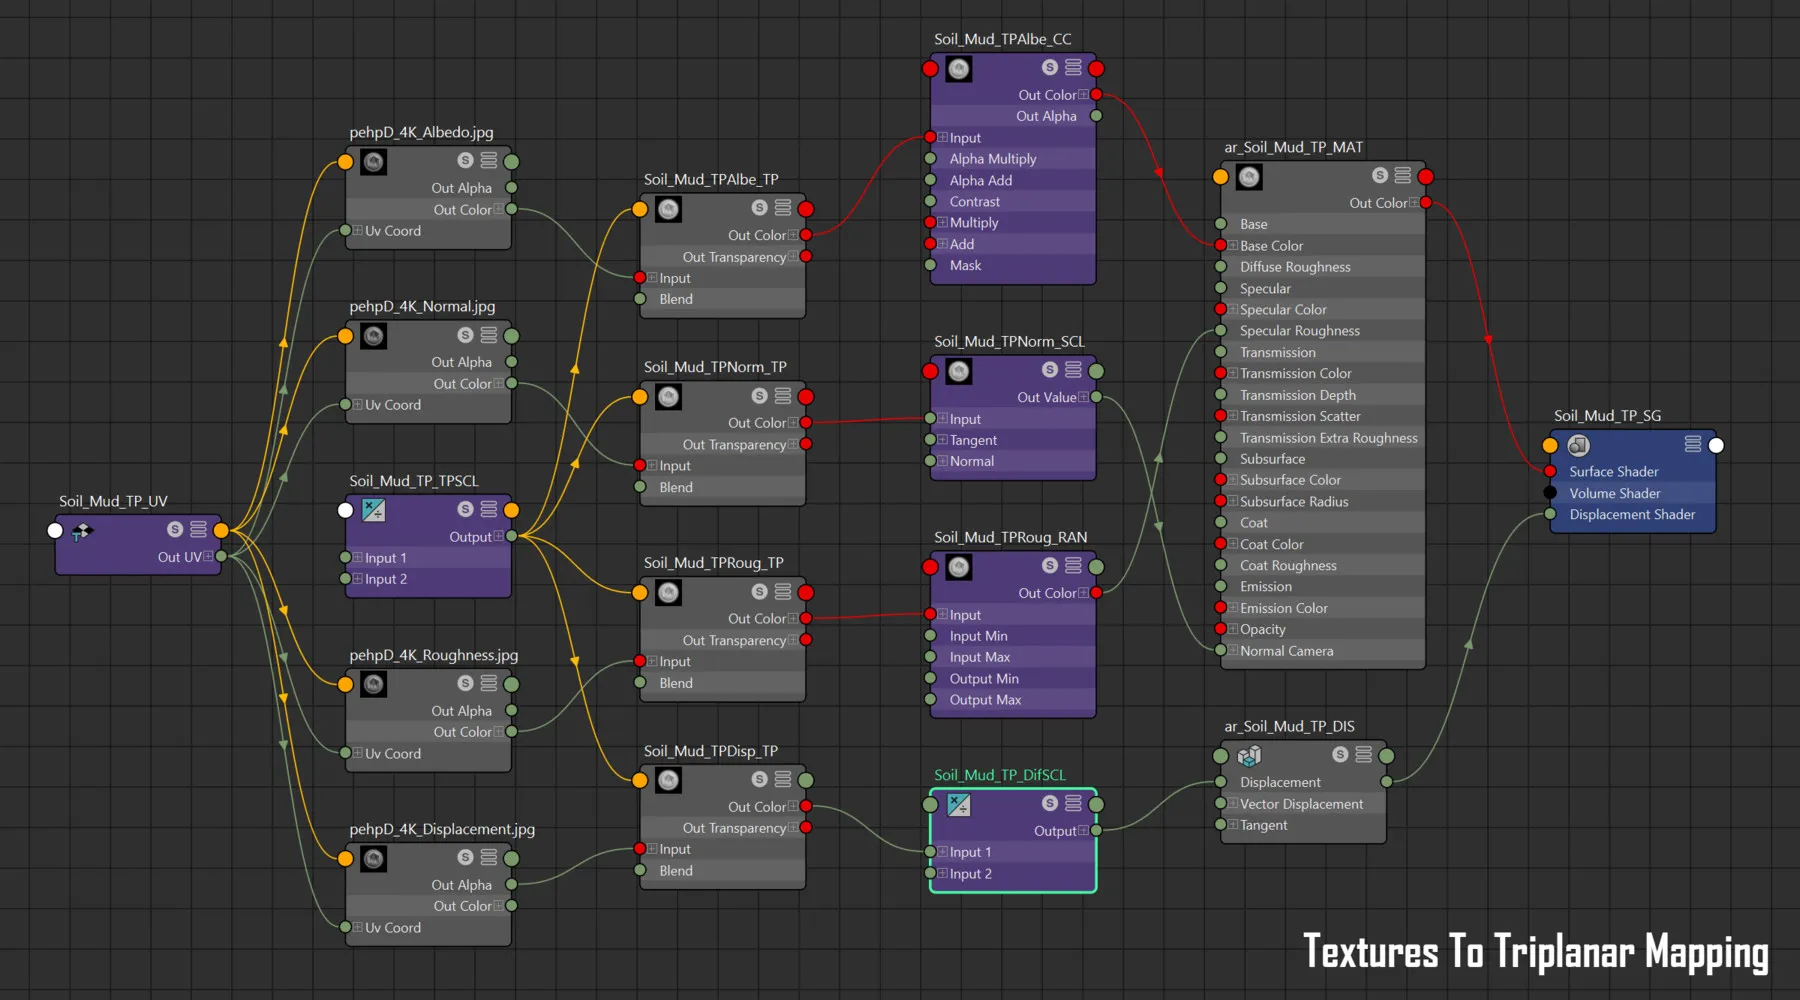
3.TriPlaner 是3方投影的貼圖法,通常用於大型場景材質使用
“At this point, you will see the texture-related information being loaded. Now, press the option in the red box shown in the image to determine the type of texture:
- UV – This is usually used.
- UDIM – Select this when the texture has a UDIM number.
- TriPlanar – This is a three-way projection method, typically used for large-scale scene materials.”
“이 시점에서 텍스처 관련 정보가 로드되는 것을 볼 수 있습니다. 이제 이미지의 빨간색 상자에 표시된 옵션을 눌러 텍스처 유형을 결정하세요:
- UV – 일반적으로 이 옵션을 사용합니다.
- UDIM – 텍스처에 UDIM 번호가 있는 경우 선택하세요.
- TriPlaner – 이것은 3방향 투영 방식으로, 주로 대형 장면 재질에 사용됩니다.”
「この時点で、テクスチャに関連する情報が読み込まれるのがわかります。次に、画像内の赤い枠のオプションを押して、テクスチャの種類を決定します。
- UV – 通常はこちらを使用します。
- UDIM – テクスチャがUDIM番号を持つ場合はこちらを選択します。
- TriPlaner – これは三方向からの投影方法で、通常は大規模なシーンのマテリアルに使用されます。」
"4"

點擊右下ICON就產生材質!!
就是這麼簡單!!!
“Click the bottom right icon to generate the material!!
It’s that simple!!!”
“오른쪽 하단 아이콘을 클릭하면 재질이 생성됩니다!!
정말 간단합니다!!!”
「右下のアイコンをクリックするだけでマテリアルが生成されます!!
それだけで簡単です!!!」

其他功能
기타 기능 || その他の機能

注意:為避免重複材質的問題,當場景中有相同名字則不會產生新材質
當你有特殊需求產生重複材質時你就需要手動變更名稱
Note: To avoid duplicate materials, a new material will not be created if a material with the same name already exists in the scene.
If you have a special requirement to create duplicate materials, you’ll need to manually change the name.
주의: 동일한 이름의 재질이 씬에 이미 있는 경우, 중복된 재질이 생성되지 않도록 새로운 재질은 생성되지 않습니다.
중복된 재질이 필요한 경우에는 수동으로 이름을 변경해야 합니다.
注意: 重複した材質を避けるため、シーン内に同じ名前の材質が存在する場合は新しい材質は作成されません。
特殊な要求で重複した材質を作成する必要がある場合は、手動で名前を変更してください。

Textures:可以選取不同的Format

- Multi-SubD: 先選取複數物件點擊可以對大量物件設定Subdivision
- Multi-Displacement: 先選取複數物件點擊可以對大量物件設定Displacement
- V_edgeLength/V_maxSubdivs:針對Vray的Subdivision參數
- Multi-SubD: First, select multiple objects, then click to set the Subdivision for a large number of objects.
- Multi-Displacement: First, select multiple objects, then click to set the Displacement for a large number of objects.
- V_edgeLength/V_maxSubdivs: Parameters for Vray’s Subdivision settings.
- Multi-SubD: 여러 개의 오브젝트를 먼저 선택한 다음, 클릭하여 다수의 오브젝트에 서브디비전(Subdivision)을 설정할 수 있습니다.
- Multi-Displacement: 여러 개의 오브젝트를 먼저 선택한 다음, 클릭하여 다수의 오브젝트에 디스플레이스먼트(Displacement)를 설정할 수 있습니다.
- V_edgeLength/V_maxSubdivs: Vray의 서브디비전(Subdivision) 설정을 위한 파라미터입니다.
- Multi-SubD: 複数のオブジェクトを選択し、クリックして大量のオブジェクトにサブディビジョンを設定できます。
- Multi-Displacement: 複数のオブジェクトを選択し、クリックして大量のオブジェクトにディスプレイスメントを設定できます。
- V_edgeLength/V_maxSubdivs: Vrayのサブディビジョン設定用のパラメータです。
Shading Network
Shading Network
針對Magascans的assets使用功能介紹
“Features Overview for Using Megascans Assets”
“Megascans 자산 사용 기능 소개”
「Megascansアセットの使用機能紹介」
- 最後,使用後覺得工具好用想給我鼓勵支持,也可以透過下面網站購買!!感謝!
- “Finally, if you find the tool useful and would like to support and encourage me, you can purchase it through the website below! Thank you!”
- “마지막으로, 도구가 유용하다고 느끼셨고 저를 응원하고 싶으시다면, 아래 웹사이트를 통해 구매하실 수 있습니다! 감사합니다!”
- 「最後に、ツールが役に立ったと感じ、応援したいと思っていただけたら、下記のサイトから購入することができます!感謝します!」